


Yoast: it may sound like a breakfast option (does anyone else get ‘yoghurt on toast’ vibes? No … just me then) but it’s actually a useful SEO tool for WordPress websites.
Many website managers will be familiar with the Yoast plugin as a way to add a meta title and meta description to their pages – but did you know that it can do so much more than that? Our superb SEO team has created this useful guide that outlines the best features and our recommended practices for getting the most of your Yoast SEO plugin.
What is Yoast SEO?
Yoast is a WordPress plugin that helps to optimise websites for search engines. This plugin has many features which can simplify the SEO optimisation process of any company’s website.
8 Tips for Yoast SEO
As you might know – and if you don’t, don’t worry, we got you! – WordPress now has two options for editing: Classic Editor and Block Editor. You can choose to switch from one to another, but we’ve given our recommendations for both below.
Without any further ado, here are our top tips to use the Yoast SEO plugin to the fullest.
- Install Yoast SEO in WordPress
- Aid On Page Optimisation
- Solve SEO issues through Search Appearance
- No-index pages
- Set up your media and taxonomies
- Avoid duplicate content issues
- Set up breadcrumbs
- Understand your RSS feed settings
- Further optimise your website using Yoast SEO
1. Install Yoast SEO in WordPress
The Configuration Wizard is a feature that helps to set up the plugin. It matches the needs of a specific site and makes sure that the configuration is up to date. You can find it under the ‘Dashboard’ tab. In ‘Dashboard’ you’ll also be able to check for potential problems and see all sorts of notifications, such as version updates.
2. Aid On Page Optimisation
There are a number of features within the plugin that provide feedback and suggestions about how SEO friendly the page content is.
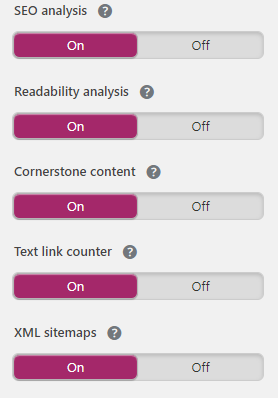
Classic Editor: You can enable and disable the options according to your needs. Here is our recommended configuration and the reasoning behind it.

- SEO analysis: This provides feedback about the state of optimisation of the content, so it can rank for the desired key phrase/keywords. It also points out elements that are not directly related to the key phrase, such as internal linking opportunities.
- Readability analysis: This provides feedback about elements such as length, tense and use of sentences, headings, subheadings, etc., in order to determine if the copy is readable. Yoast provides recommendations for any aspects that need to be improved.
- Cornerstone content: A page designated as ‘cornerstone content’ is allotted more authority within your site, which gives it a better chance of ranking higher and getting more organic traffic. This feature allows you to mark and filter cornerstone content on your website.
- Text link counter: This feature allows you to identify how many links a post has. It shows the number of internal text links coming from your post as well as the ones linking to it.
- XML Sitemaps: XML sitemaps are automatically generated by the Yoast SEO WordPress plugin. However, we think it’s worth doing some manual work by going to SEO > Search Appearance to make sure they are in place and working correctly.
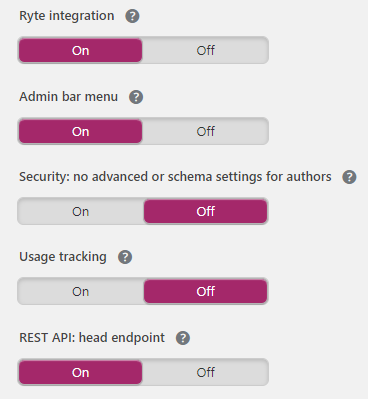
- Ryte Integration: This feature allows you to check on a weekly basis if your site is indexable by search engines and will notify you when it’s not.
- Admin bar menu: This feature presents useful links to different third-party tools for analysing pages.
- Security: This section is specified for being only for editors and administrators. It allows users to remove posts from the search results or to change the canonicals as well as the schema meta data.
- Usage tracking: This feature allows users to track data about your site in order to improve the plugin.
- Rest API Head Endpoint: This feature provides all the meta data needed for a specific URL, and it is often the only Yoast feature that users regularly take advantage of.
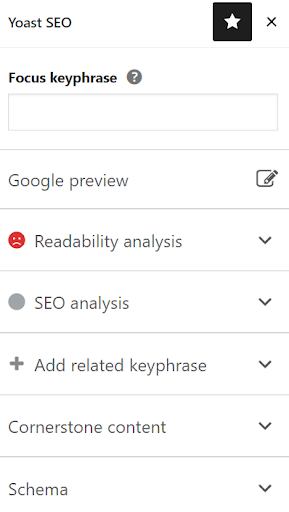
Block Editor: The Block Editor is slightly different in view but presents almost the same features as the Classic Editor.
We’ve said almost, because in the Block Editor menu, you’ll also find:
- Focus keyword phrase: The phrase that you want the post to rank for needs to be added in this field. In order to identify which key phrases to use you will need to carry out keyword research. When the focus key phrase is added under the SEO analysis tab, you’ll be able to get key findings about how to use the key phrase more effectively.
- SEO Analysis: Once the key phrase is added, the key findings you’ll see will include the key phrase position and density within the content, as well as areas of improvement and good results.
- Google preview: The preview displays how the site would look like in the SERPs, when using Google and other search engines. By using the snippet preview, it is possible to add the title and meta description.
3. Solve SEO issues through Search Appearance
This feature allows you to make adjustments to how the site will look in search engines. To access this feature, go to Search Appearance > General.
In this section, you’ll find features for rewriting titles, adding title separators, and allocating the title and description for both the front page and blog page. However, we recommend to focus on:
Knowledge Graph & Schema: this allows you to show meta data on your site. It is intended to appear in Google’s Knowledge Graph, where you can select from being an organisation or a person and add information and assets accordingly.
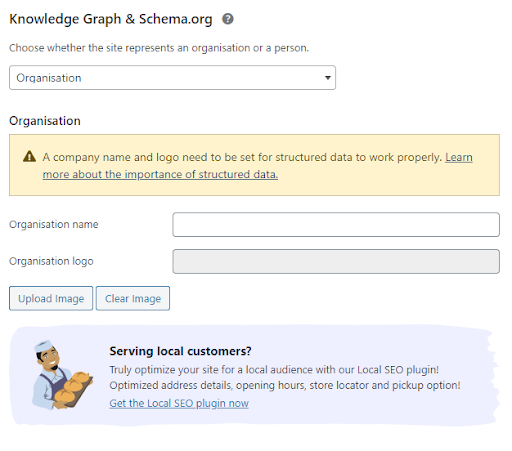
Pro tip: If you are serving local customers, you can optimise your site for your targeted audience with the local SEO plugin.
In the ‘Content Type’ section, you’ll be able to modify the settings for Post, Pages, Case Studies, Jobs and Services. The main aim here is to determine if you want to show those pages in search results, and also to show SEO settings for the posts.
4. No-index pages
This is a useful tool for non-technical web managers to prevent pages from appearing in the search results. This is useful because it allows you to have control access to your site, page by page.
You’ll need to go to Search Appearance > Content Types.
In this section you’ll find different settings that allow you to specify what the default search appearance of your content should be per type.
Eg. Services – You can choose if you want this content to appear in search results and what the description should be.
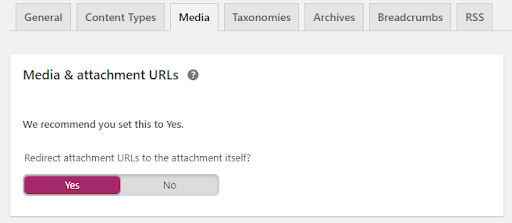
5. Set up your media and taxonomies

The media section allows you to save an image/video and create an attachment URL to redirect them to the media item itself. This is recommended practice as usually the attachments pages are empty.
The Taxonomies feature allows you to select whether you want different items such as categories, tags, formats, services and sectors. For categories only it allows you to keep or remove the prefix /category/.

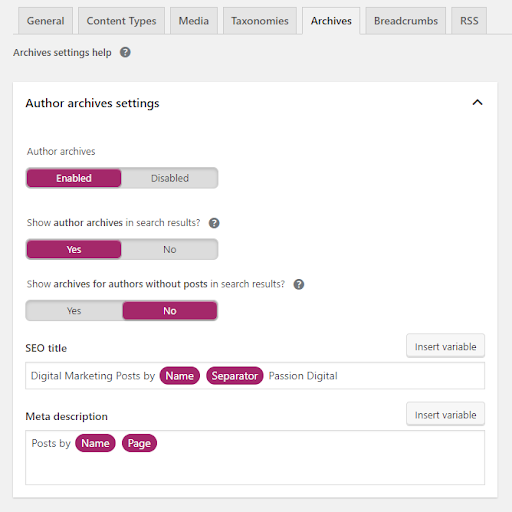
6. Avoid duplicate content issues
When running a single author blog, it’s important to be aware of possible duplicate content issues. To avoid this, you can disable the author archives to redirect them to your home page instead or add a noindex,follow to it, so it won’t show up in the search results. You can also manage this for your ‘Date archive settings.
7. Set up breadcrumbs
Breadcrumbs play an important role for SEO as they allow Google to understand the structure of your site, as well as helping users to know where they are in your website.
That’s why it’s important to enable them within your pages and customise them with separators, anchor text and a prefix for the search page.

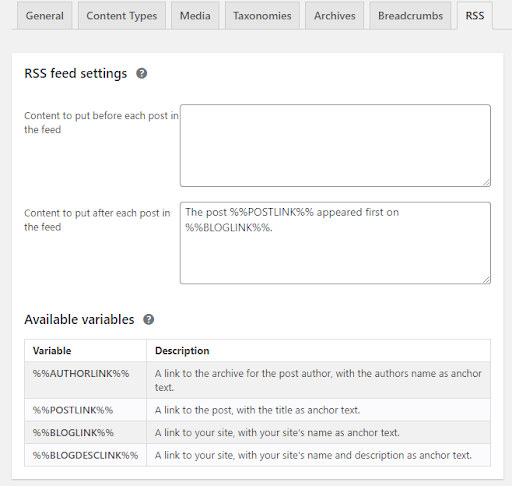
8. Understand your RSS feed settings
The RSS feature automatically adds links back to your blog and blog posts, which ultimately helps search engines identify your site as the original source of content.
We hope that this guide has opened your eyes to all the features that the Yoast SEO plugin offers for your WordPress website. If you need further advice, don’t hesitate to contact us – we’d love to help you reach your SEO goals!